Sunday, December 1, 2019

Cart Path Repairs


Beginning in December, we will begin our annual cart path replacement to repair several areas around the entire Club property.  Over the last 5 years the Board has directed the funding of $20,000 to $30,000 each year for cart path repairs to help repair some very rough and cracked panels.  This allotted money has helped to improve many areas across the golf course and Club grounds, but each year many areas in need of repair remain untouched.  This year, the Board agreed to increase the amount of cart paths repaired by allocating $100,000.  This will be a huge help in getting us back to the point where $20,000 or so each year will help us repair what is needed, thus eliminating multiple rough areas when we are finished.

        So why in the world do we spend so much money on the cart paths?  For starters, the 27 holes of golf at MCC contains over 6 miles of cart paths!  Some of the cart paths which are cracked and broken today are original to the golf course when it was built in 1990.  Others are newer panels which have been replaced more recently but broken by tree roots underneath or equipment driving over the top.  The concrete lasts up to 30 years in some areas with no tree roots, but might only last 8-10 years in heavily treed areas.  Daily wear and tear will degrade each panel of concrete over time, so it is important to replace the bad areas each year in order to not fall behind and have to play catch up, which is expensive!

         The focus of this project will be to replace the areas of the cart path which are currently very rough and bumpy to drive a golf cart.  Many of the cart paths have cracks throughout, but are still smooth to drive on.  We will not focus on the minor cracks at this time if they still drive smoothly.  Some of the golf holes in need of the most repair on the original 18 holes include #14, #9, #5, #10, and #8 tee box.  We will also plan to repair all of the bumpy or broken areas on the Overlook 9 holes.

         During this project, we will direct all cart traffic around the areas under construction.  Please be aware of rope and signs directing you where to go.  In favorable weather we should be able to complete the project in 3-4 weeks.  New cart paths will help provide us a smooth start to the New Year with many cracked and rough areas being repaired!

Friday, November 15, 2019

Edging the Bunkers

Over the last 3 weeks we have started one of our winter projects, and that is to detail all the bunkers on the golf course and cut a clean new edge around them.  Over the past 2 growing seasons since sand traps were renovated we have seen a tremendous amount of growth around the edges of the bunkers.  The grass has grown towards the center of the bunkers, causing them to become slightly smaller and lose the original edges.  The grass is some areas has become very puffy and hard to maintain or cut.  It also has developed a "shelf" or little ledge where the bunker face does not transition into the bunker consistently.  Here are a few pictures of hole #12 to try and demonstrate the situation:
I placed the rake to try and show the "shelf" that has been created by the grass creeping into the bunker.  Under the rake head is grass, but under the grass is straight sand.  The sand is supposed to the bunker, but the grass had other ideas.  The rake head is 25 inches wide, so this overgrowth is almost 2 feet wide!  The left edge of the bunker rake is where the actual original edge of the bunker was when we finished the renovation 2 years ago.  We know that because we can take a shovel or probe and push down to fine the concrete bunker liner.

Here is a close up of the ledges and overgrowth we are trying to correct.  The grass should fall straight into the bunker.  In this case, the grass levels out after the downfall, then transitions into the sand.

So what are we planning to do to fix this issue.  Well it starts with a shovel!  The shovel above is in the ground at the start of the concrete bunker liner.  When we finished the bunker renovation 2 years ago this is where the grass line started.  The grass has slowly grow into the sand, very hard to see how much it has encroached.  

We have been working to go around all the bunkers and cut a new clean edge with a shovel.  As you can see in the picture above, some of the edges have grown over very badly!  The gentleman above is simply cutting to the bunker liner, and look at all the grass we have to remove!  The golf ball has been getting stuck in these areas making for some difficult golf shots, so it is a very important thing to fix.
Here is a look at #17 green side bunker.  The yellow paint is the original bunker edge we are trying to get back.  It is easy to see how much grass needs to be removed, and how inconsistent the edge has become.

This is the bottom edge of 17 bunker as it transitions into the bunker.

Here is the same bunker edge after it has been edged with a shovel.  Notice how much smoother and consistent this edge is than before we started.  Big difference!

Over the next few weeks we will really make a push to get all the bunker edges fixed.  Golf rounds are slowing down and we will have much more time to get into the bunkers and get them back to where they need to be.  The green side bunkers are especially hard to work on when we are busy on the golf course, as there is too much interruption to get anything done in a timely manner.  To date we have completed the green side bunkers on hole #4, #9, #11, #17, and #18.  We intend to do the green side bunkers first, followed by the fairway bunkers.  Some of the bunkers are worse than others, and will be completed accordingly.  Thank you very much for your patience as we work to improve this aspect of the golf course!!!


Vandalism

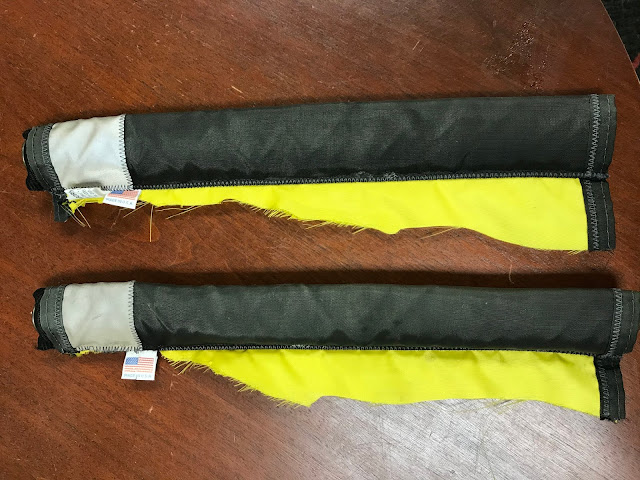
Wednesday morning when setting up the golf course we noticed something was not right.  The flag on #17 green was completely missing, and the flags on #13 green and #16 green were cut clean off the flag stick.  The picture below shows what remained on the flag stick:

The flags were apparently cut off with a knife or some sharp object.  Since these greens complexes are located near the neighborhood streets they are a little more exposed to people driving by who feel like being malicious.  It was hard to tell what happened, but this was the end result.  Please give us a heads up if you ever see anyone doing anything suspicious!

Thursday, November 7, 2019

First Frost of Fall 2019!

 This weekend we saw our first heavy frost of the Fall season!  The temperature was 34 degrees, but that was enough for the frost to set.  When this happens to our Bermuda grass it does not kill the grass, but causes it to go dormant for the winter.  Whenever the first good frost happens, this signals the grass that winter is coming.  The grass plant then begins to store carbohydrates and nutrients to use to overwinter in the cold.  We will probably see most of the green grass color turn to brown in the next 7-10 days.  It is never fun to see the green grass leave each year, and we can only hope it comes back early next Spring!

Thursday, October 31, 2019

What are all those dead spots on 14 green?

If you have played golf over the last 6 months you may have notices some brown, dead spots across #14 green.  These spots are irregular shaped brown areas, where the grass has been completely killed, and the outside edge of the dead spot is green healthy grass.  These dead spots are actually caused by a Blue Heron.  The large birds like to fish around the pond on #14, and as he walks and flys across the green, he poops all over the place!  These droppings are very large and look like white paint splattered everywhere when they are fresh and new.  Over time the waste kills all the grass it comes in contact with, killing large areas of the putting green at times.  The pictures below show examples of the damage the Heron causes!

Here are two spots killed from Heron droppings, I put a can of wasp spray to help show how large these areas can be.

Another spot killed by a Heron.  On the day I took these pictures there were 13 different dead spots across 14 green!  

How do we fix these dead spots?  We use plugs from our nursery green which has healthy grass, and simply remove the damaged turf.  The new, healthy plug is then inserted and leveled to the same height of the green.  The picture above shows the plugs we used to fix the dead spots from the picture above with the wasp spray bottle. The plugs are noticeable the day after they are inserted in the green, but quickly grow together and blend into the green.

So what can we do to prevent the Heron from damaging the green?  Not a whole lot really, but we are going to try anything possible!  That means Heron decoys positioned by the green on 14 to try and prevent the birds from getting comfortable.  Blue Herons are said to be very territorial, and when there is another Heron on the pond they will not land or come to that same body of water.  We have purchased a few Heron decoys to see if we can have any luck!  Our staff repaired the green completely, and then we installed the decoys.  We plan to watch the green over the next week or two and see if the decoys will help reduce the Heron damage! 

Another picture of the Heron decoys, we have them positioned on both sides of #14 green!

Here is a picture of a live Blue Heron fishing around 3 green!  This picture was taken the same day we put the decoys out  on hole #14.  We see damage from feces on #3 green as well occasionally, but not near as bad as #14!

Thursday, September 26, 2019

Big Dead Tree on #11

A few weeks ago we took the chance to remove a large dead tree on hole #11.  When I say large, I mean very large!  The diameter of the tree measured 5 feet across!  This Oak tree had been on this property for at least 100 years, but almost all the leaves were gone and it was starting to shed some large branches which have become a danger.
You can see from this picture the old tree has seen better days.  Due to concerns about safety we decided to remove the tree and clean up the area.
This golf cart is 4 feet wide.  The tree trunk measured 5 feet wide!

A crane was needed to help the tree crew remove the large branches and trunk.

All the branches are gone now!  Just the massive trunk is left, and it was quite a job to get it all cut up!  Took some pretty large chainsaws and large equipment to complete the task.


Here is a video of all the equipment working at one time to cut down the tree.  Pretty cool to see all the equipment work, and to see what can be accomplished with nice equipment!  It took the company about 5 hours complete this job start to finish!  We counted around 100 rings on the tree stump, so this tree had definitely seen some interesting stuff, both good and bad tee shots on hole #11!


Greens recovering quickly!

Aerification has come and gone, and now the greens have been trying to battle the extended summer heat.  The hot weather has actually been a huge help on the greens as it provides great growing weather for the grass to fill in the holes.  During this recovery process we have to water more than we would typically like because the holes can cause the greens to dry out more rapidly.  The water does however help the grass to grow more vigorously by not allowing stressful periods to occur.  It has only been 3 weeks since we punched the greens, but the holes are almost fully recovered! 
Here is a picture looking straight down on the green the day after we aerified on September 5th.  You can see there is quite a bit of sand on the surface, and almost all the holes are full of fresh new sand we added before we punched the holes.  

Here is a picture from September 12th, one week after the photo above and one week after punching!  See how much recovery can happen in just 1 week!  The holes are still visible but have started to grow over.  The sand has worked itself into the greens profile and the grass has grown through.  It just takes a little bit of patience during these times but the grass will come back stronger than before!
One week later on the 19th, just a little over 2 weeks after aerification, and the greens are almost fully healed!  Holes are now much harder to see, and the grass has grown back to create a much better putting surface.  The greens are still not all the way recovered, but putting on the greens is much improved!  Once we start to have some continuous night time temperatures in the low 60's or 50's we will start to see even more improvement.  For only 3 weeks after aerification we are in a great spot and the greens are very healthy!  We will have a great Fall golf season, we just need some rain!!!


Wednesday, August 14, 2019

Please be careful of Lightning

Remember to always take the lightning alarm seriously!!!!!

Late last night a thunderstorm came through and dropped over a half an inch of much needed rain on the golf course!  One casualty of this storm we recognized this morning was a large oak tree on MCC Club Drive was struck by lightning.  The lightning blew all the bark off of the lower part of the trunk, throwing large chunks of bark up to 40 feet from the base of the tree.  We hope this tree does not die from the strike, but more often than not the lightning damage is a mortal wound.    

Here is a look at the damage to the center of the tree.  This union of all the branches is looks like it took a direct hit!

A far away look shows the tree compared to all the others.  Obvious to tell which one it is!

Wednesday, July 31, 2019

Get-It-Out Lift


If you have played golf in the last week you probably have noticed the black rings around the bottom of the flag stick.  These rings are called Get-Out-Lift, and are designed to help remove the ball from the cup without sticking your hands in the hole.  With the rules of golf changing this year allowing the flag stick to remain in while putting, many people have adapted to the new rule.  However, when putting with the flag sticks in, sometimes golfers will reach their hand in to get the ball without removing the flag stick.  This can cause the edges of the cup to get damaged if not careful, and we have noticed more wear than usual this summer.  To see if we can reduce any damage to the cups, we have decided to try the Get-Out-Lift.  Please let us know your feedback as you use these new devices and let us know your thoughts!   


Sunday, July 28, 2019

Verticutting Fairways


Fairway maintenance took our full attention over the last week!  Trust me, the last thing any Golf Course Superintendent wants to do is tear up beautiful grass!  Sometimes, it takes a little roughing up the stone to make it shine, and that is the outlook we used on the fairways this week.  So, why do we verticut the fairways?  What is a verticutter?  Will it ever grow back?  Those are all great questions I have been asked over the last week, and I wanted to shed some light on this dirty, dusty process.

So what is verticutting?  Verticutting is defined as vertical mowing, which uses blades orientated straight up and down to cut slits into the turf profile and remove thatch which builds up over time.  The thatch can lead to a "puffy" or "spongy" turf surface which does not create a very consistent fairway lie.  Bermuda grass grows very aggressively and naturally creates a lot of thatch.  By removing accumulating thatch each year, we can help to keep our fairways growing tight and consistent like carpet.  This is the goal anyway!

We choose to do this process in the middle of the summer time when the weather is hot, and the bermuda grass is most actively growing.  Some of the the first fairways we verticut on Monday, July 15th, have already shown very rapid recovery.  Within a few weeks the grass grow back it will hardly be noticeable anything was done.  Below the turf surface we have created many new growing points  during the process, growing new leaf blades to fill in the voids.  The result with be a much firmer, tighter grass canopy that should improve the play of the golf course.  

Buddy looks about as excited as I am about tearing up good looking fairways!  Here is a look at the verticutter in action working on #8 fairway.
     

Here is a look at the fairways immediately after the machine goes over the turf.  The lines are cut in the turf canopy to help remove the thatch.  You can see all the excess thatch laying all over the turf surface.  I cleaned a little bit away to show the lines that are left, compared to the fairway surface before we started the process.

Big handful of the thatch and sprigs that were removed from the fairways!  A lot of material we can do without!

So how do we pick all the unwanted thatch up and remove it completely?  Well a vacuum of course!  This year we were fortunate for the Club to purchase a Multi-Vac 772, which has already proved to be very handy!  The vacuum runs behind the verticutter and sucks up almost all the debris left over.  You can see in the pictures the before and after of where the tractor drives, almost all the debris is removed and stored in the hopper to be dumped off site.  


View from the tractor pulling the vacuum.  Green grass showing is the first pass made with the vacuum!  Works Great!

After the vacuum does its job, it is time to mow the grass to start to even it back up.  It takes a few cuttings to get everything smoothed out.  After we mow, the blowers will come behind and clean up all the loose material remaining.

This is a photo of #8 fairway, the day after we finished the entire verticutting process.  While the fairway is brown and not nearly as green and pretty as when we started, it is still an acceptable surface to play golf on.  Within 2-3 weeks it will be hard to tell we did anything at all, and everything should look much better!


Wednesday, July 3, 2019

New Walk Path on #14

Monday we took advantage of a hot, dry day to install a new walk path on hole #14, leading to the white and green tee box.  The idea for a walk path in this location has been discussed by the Grounds Committee for quite some time, but because of our busy schedule it has been hard to find time to complete the project.  I would like to show you in pictures how we built this new path.

This is the area we we chose to install the walk path.  It has been the chosen trail for some time now, and along with some rocks and tree roots it made for a rather rugged walk.  In the foreground of the picture you can see a small portion of the pathway material we used to make a ramp down from the cart path about a year ago with some excess we had left from a previous project.  In the grass you can slightly see the walk path we mow into what is currently mulch and fescue grass walk path.

  
The first step is to grade out the area for the path.  The thickness of the entire path is about 5 inches in depth, so we went down 4-5 inches from the original grade to prepare the base for the path.  We use boards to form up the sides to help us keep a consistent line and helps the material where we want it and allow it to set-up properly.

The base material we use for the walk path is crush-r-run, or a DOT approved material that packs well and is a mixture of standard gravel and fine stones.  We install this material at a depth of 2 inches throughout the bottom of the path.

So what exactly are we using to build this path?  The product is called Kafka Granite, and it is a combination of a polymer and a lot of very tiny granite rocks.  The polymer acts as a glue that hardens and sticks everything together to make a firm surface.  The polymer actually continues to get harder and more consistent over time, allowing the walk path to become durable and withstand years of use.  The Kafka Granite is made in Wisconsin, and shipped in large sacks containing 3,000 lbs each.  This surface is similar to concrete when it is completed, but much more cost effective.


The Kafka Granite is spread evenly throughout the path area, on top of the crush-r-run sub-base we had previously installed.  We try to put 3-4 inches of the material at first, and then run a vibratory tamp across the top to compact the material.  This picture above shows the material being spread evenly.

This is another picture showing the crew installing the Kafka Granite.  Look at the boards to see exactly how much material we are installing on the path.  The grey colored material is the base layer, and the light brown material is what will ultimately be the path surface.  The white bag is the 3000 pound sack the product was delivered in.

A vibratory tamp is used to compact the new material and firm it into a usable walk path.  Adding a light mist of water during this process helps to allow the polymer to start solidifying everything together.

The vibratory tamp works very well to firm up the surface.


Notice where the smooth area is that has been tamped is about 2 inches lower than the loose material used to fill the forms.  This is why we install so much of the Kafka material at the beginning, because it really packs well.  Ideally we would like to see a finished surface of 3 inches thick of Kafka granite, after the tamping process.
All that is left will be to finish the surrounding landscape to make the walk path look like it has been there forever.  This path material blends very well and looks very natural.  Hopefully once completed it will improve this stretch for the golfers walking to #14 tee box!